

Tour a 1,001 sq ft HDB flat home transformation: How a couple broke down walls to create a bright open-plan layout

PHOTO: Stackedhomes
There’s a reason why recently MOP-ed HDB units are in demand. Given the newer condition (compared to an older HDB resale), you’re less likely to spend a fortune for the reno since it’s newer.
However, this notion is not actually set in stone. Some new homeowners choose to go with a recently MOP-ed route only to end up, unknowingly, with a more stressful reno experience.
This is what Audrey and her husband (@ebbys_home) experienced with their four-room HDB. In fact, they were willing to forego some of their preferred unit features for the sake of convenience and proximity to places they visit frequently.
“We found our unit in the Geylang district,” Audrey said, “and while it didn’t tick every box such as a balcony, nice view, nearby park, and larger square footage, it’s closer to places we enjoy going to.”
She said that the estate recently MOP-ed. “We bought the unit thinking it was in fairly good condition and could save in reno.”
But upon handover, Audrey regretfully said that they noticed one too many issues in the existing build. What they thought was a simple reno journey turned out to be an extensive overhaul of the place.
Today, the couple and their senior mini schnauzer, Ebby, are enjoying their home after overcoming the challenges in their reno journey. Let’s have a closer look at the results of their reno and how exactly they managed to get through without breaking the bank.
While they were house hunting for a four-room resale HDB, Audrey and her husband allocated a reno budget in the range of $40,000 to $50,000 (under the assumption that the flat would be in good condition).
As it turns out with the actual condition, they needed to allocate between $50,000 to $60,000 instead and firmly stuck to that budget.
From a space-planning perspective, Audrey wanted to achieve the same generous space they had in their childhood homes in the 80s. She knew that younger properties, in contrast, have very limited spaces.
So in order to achieve this, they had to remove the two common bedrooms blocking the flow. Aside from giving more room to communal areas, it would also help let in more natural light and breeze to the home.
Audrey recalled that her family also had an open kitchen, which she loved very much.
“I loved how it enlarges a space and facilitates interaction between people at different parts of the house,” she said. Thus, they decided to go with a similar open layout as well.
The couple also made sure to future-proof their home layout. While they don’t have kids yet, they wanted to ensure that as their family expands in the coming years, they wanted their children to stay together in the same room.
It’s the same set-up that Audrey and her husband had during their childhood, which created a lot of fond memories with their siblings.
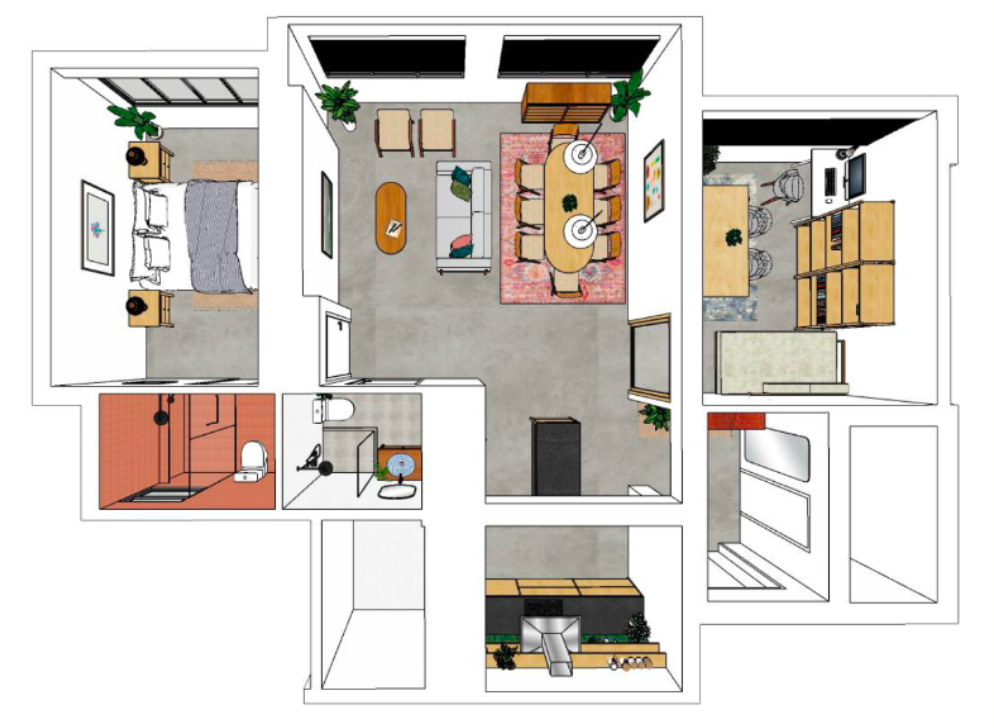
As a result, they converted their four-room flat into a two-bedroom home – that is, two large bedrooms.
When it comes to their interior style, Audrey combined the decor of her parents’ first and second homes and modernised them. “I grew up in a home with square-format terracotta floors in the living room,” she recalled, “and my parents’ second house had black granite countertops in the kitchen.”
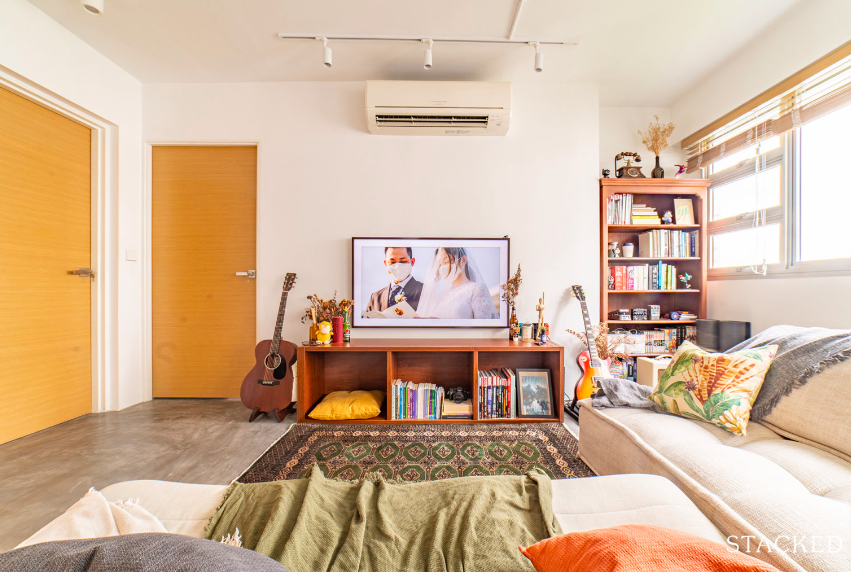
For their furniture choices, they both agreed to keep them low to visually expand the space and give the illusion of higher ceilings.
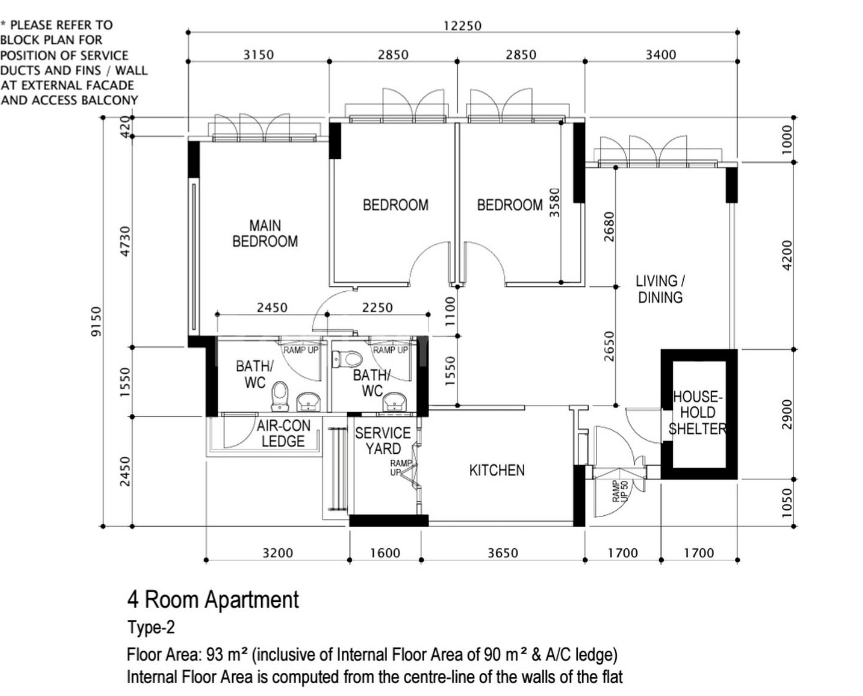
Some of the major changes their home layout underwent include converting the original living area into a room, combining the common bedrooms into a living and dining area, and pushing out their master bedroom wall to fit a wardrobe. They also made some considerable changes to the layout of their master bathroom.
Another big change was the overhaul of the entire unit’s flooring from vinyl to cement screed. However, she said they chose to have wet areas like the bathrooms and service yard remain tiled for practicality.
The best way to understand how their home turned out after the reno is to see their pictures. Without further ado, here’s how everything turned out.
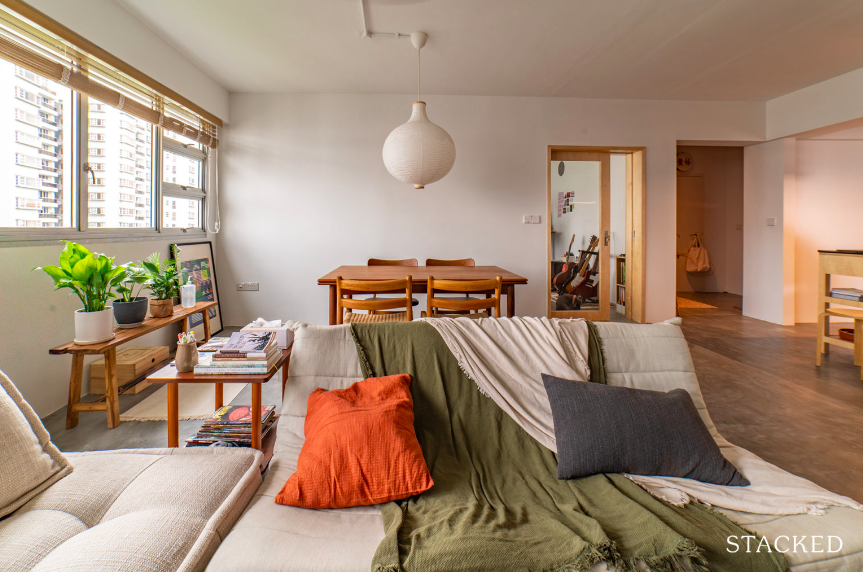
By combining the two common bedrooms and hacking the walls facing the kitchen, they were able to create an open floor plan which now serves as their living and dining space. “This was the most significant change,” Audrey said, “and essentially turned our layout into a dumbbell layout.”
Two rooms – the master bedroom and the study – now flank the sides of this communal space.
The original common bedroom windows are mirror images of each other, creating symmetry in the living and dining room.

The furniture choices in the living room, as well as in the dining area, give off a very cosy vibe to the space. In the dining area, the presence of rattan on the chairs also helps provides a bit more texture.

There is a portion of the wall shared with the living room’s TV wall that couldn’t be pushed out from the master bedroom side because it was a structural wall. Fortunately, a bookshelf that Audrey’s parents gave her fit snugly in this 90-centimetre wide space.
The kitchen is now extended, occupying what was originally the dining area. As a result, it allowed them to have an open area for guests to help with the prep.

The island – with its sleek black countertop – is the heart of their kitchen. It is one of the first views from the entrance, so the couple instinctively put down their groceries there. It’s also where their guests usually first gather.

Their fridge, oven, and full-height pantry are located behind the island since they wanted the counter to be used for both cooking prep and baking. “We also placed our fridge closer to the living so guests can help themselves to drinks,” Audrey said.
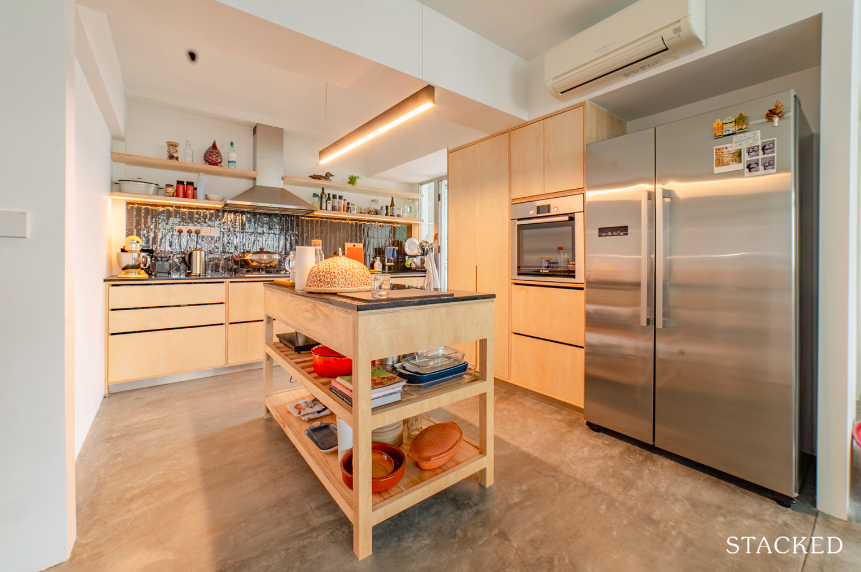
To maintain the open-concept space look, they had the taller carpentry and appliances flushed against the wall, neatly tucked away and yet easily accessible.

Audrey recalled that the original kitchen had two louvre windows opening into the service yard. They now have one window, which they changed into a fixed glass for easier cleaning.
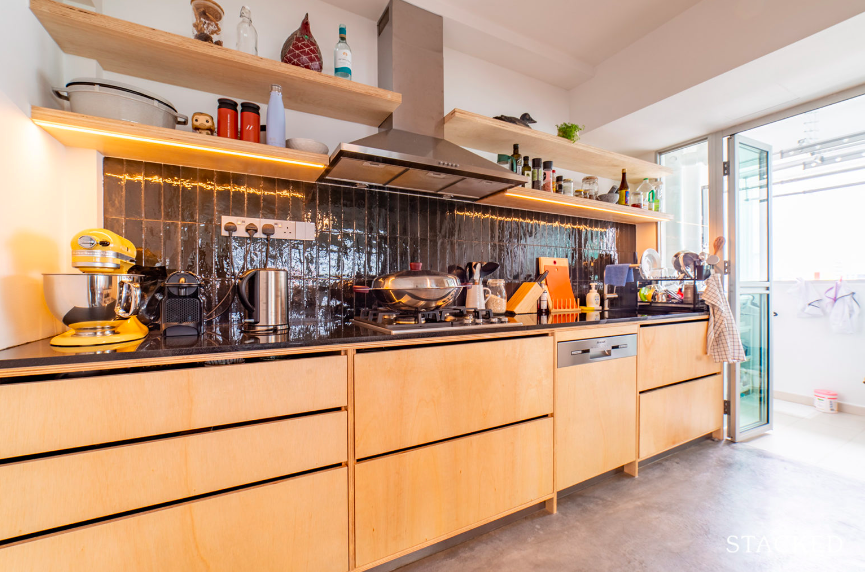
Plus, it allows them to close the yard completely when cooking. They replaced the other window with a full wall to accommodate their two-door full-height pantry.
Previously the living room, they turned this space into an enclosed room by extending the bomb shelter wall and the wall shared by the previously adjacent common bedroom.
Aside from creating additional privacy for the study (which the couple is planning to use if they had to work from home) it also creates a foyer area.
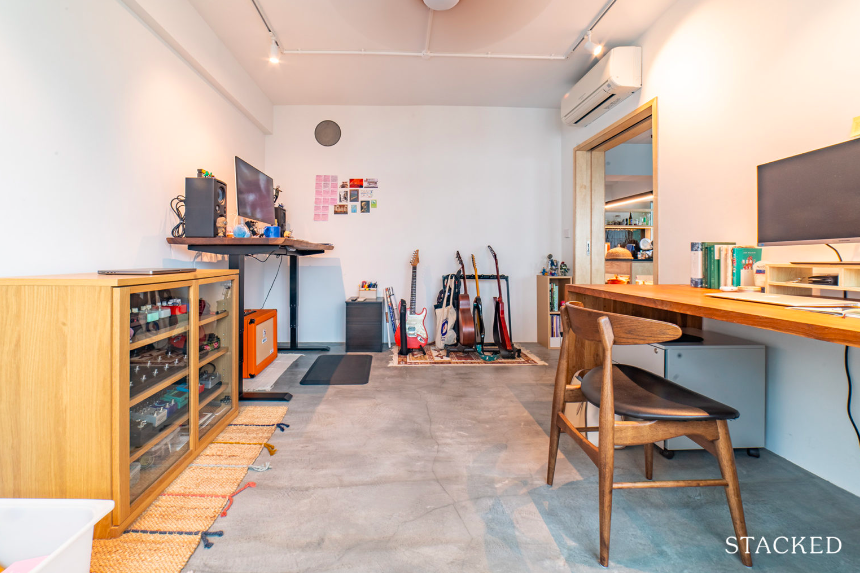
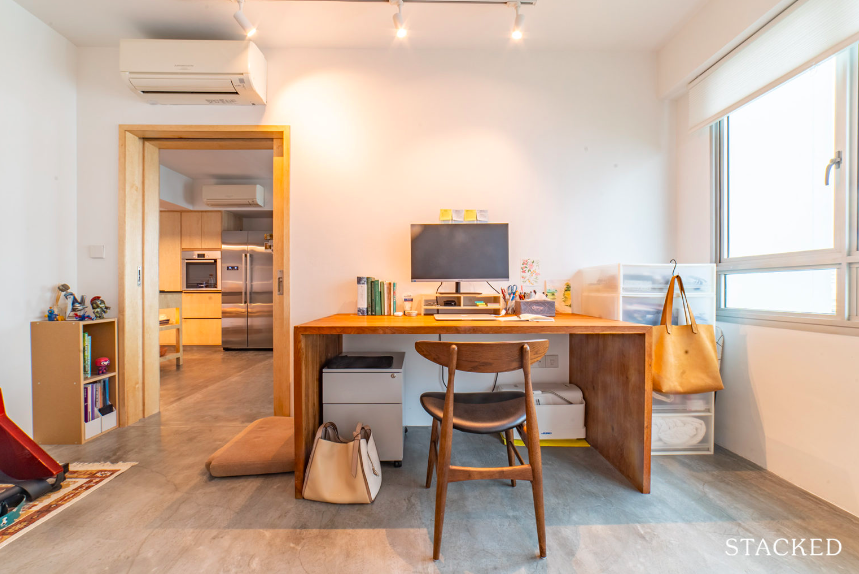
Audrey said that when they extended the wall of the study to the recessed area in the common bedroom, it created a space to accommodate a pocket sliding door.
The door is intentionally see-through to enforce the open concept further, allowing more light into the kitchen area.

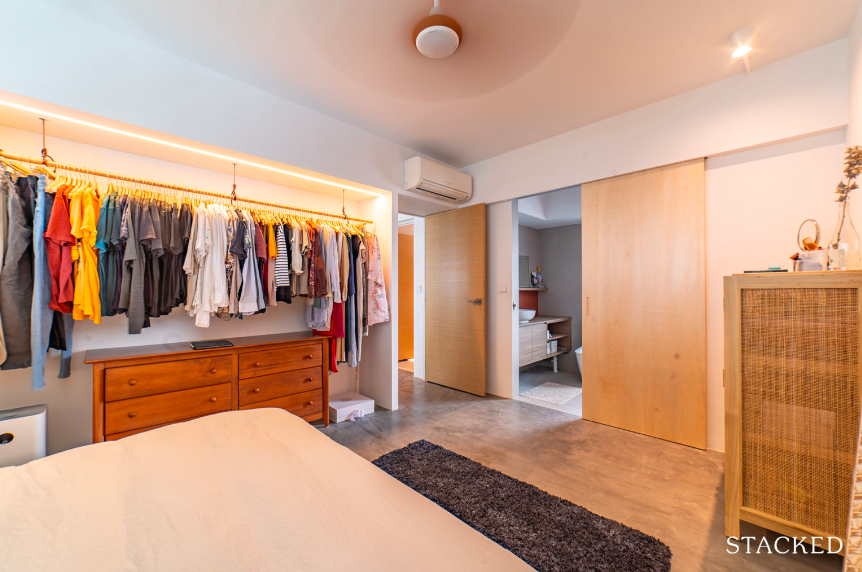
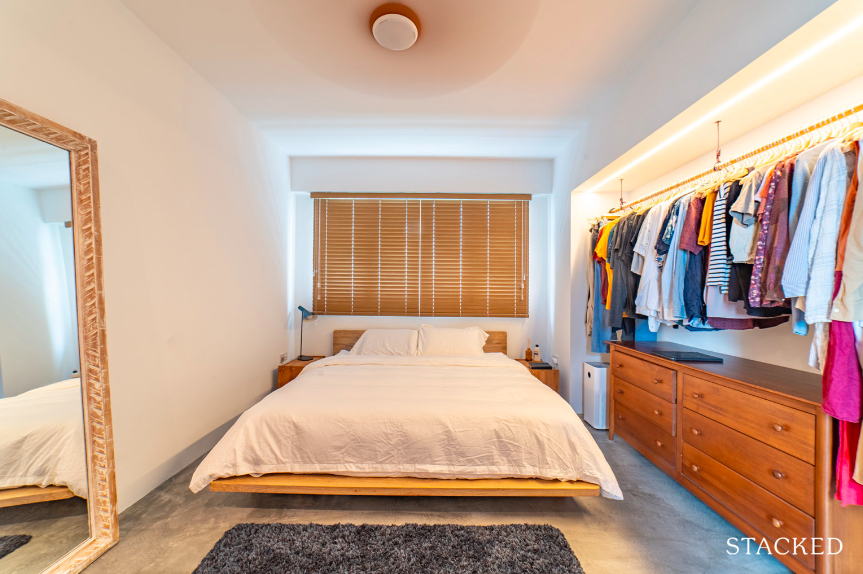
With one of the master bedroom walls pushed out, the room is able to accommodate a wardrobe without making the room feel too cramped. Audrey said they saved on carpentry costs too by opting for an open wardrobe.
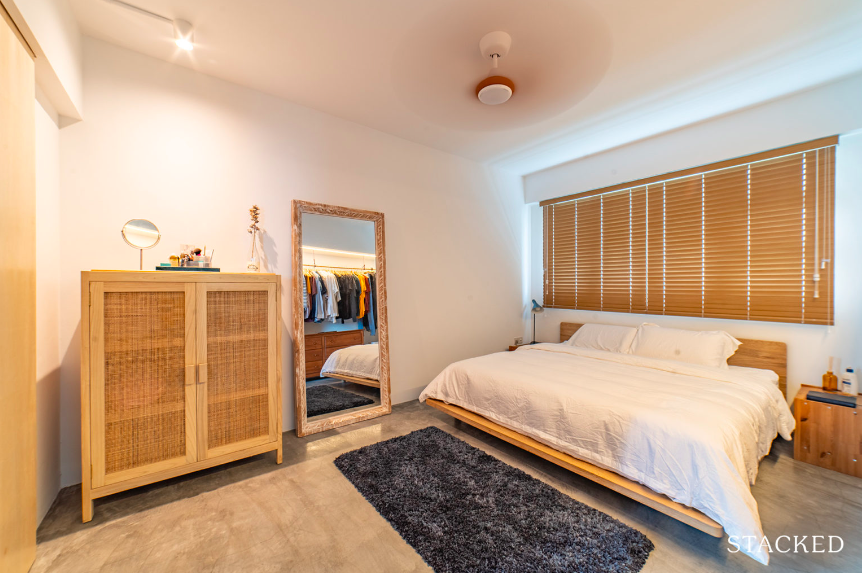
Since the space is now larger than it used to be, they were able to fit in their king-size bed as well. She said they also arranged the room so that they could fit a baby cot in the future.
They left the common bathroom’s layout as is. “We only changed two strips of tiles that HDB had installed in the shower area as a kind of feature wall,” she said. They swapped those out for white tiles to match the rest of the white wall tiles in the original HDB build.
They also changed the bathroom fixtures for hygiene reasons, such as the toilet bowl, sink, taps, and shower heads. The vanity and the mirror from the previous owners still looked good though, so they only changed the laminate.
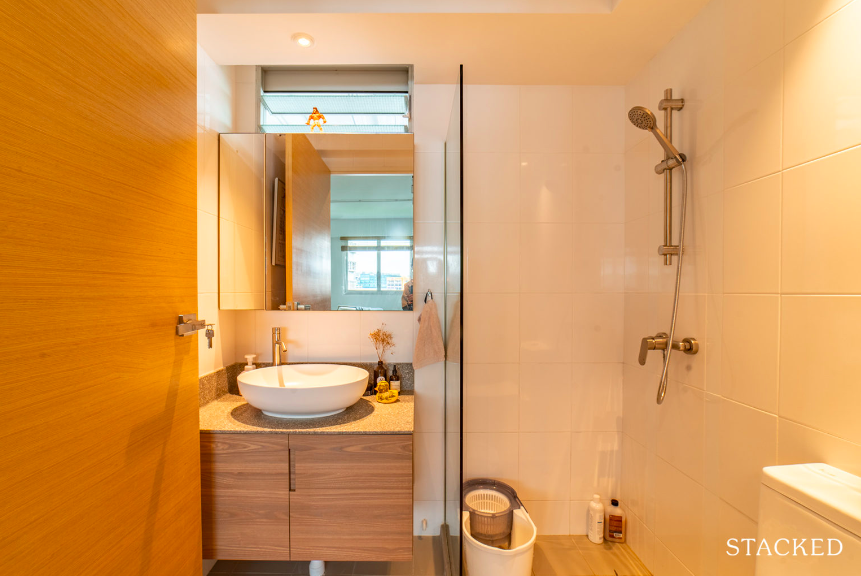
They did a number of layout changes in the master bathroom, one of which is the shower area. Previously, it sat next to the window, so they moved it to the opposite wall for privacy. They also took this opportunity to optimise the entire length of the shower area.

To accommodate a long vanity, they had to shift the sink, which was originally next to the WC. Also, instead of a swing door, they changed their master bathroom door to a sliding type to save space.

A half-height wall hides the pipe extensions and doubles up as toiletry shelving. Audrey said their ID also boxed up the overhead pipes in both toilets to make it look neater and more seamless.

Audrey said that their vision, for the most part, was turned into reality. “The space planning was great and I think the master toilet works a lot better than before.” She thinks that their decision to add $10,000 to their budget so they can reconfigure the layout is a lot better as opposed to doing only a minor touch-up or facelift.
In retrospect, she said that they would have ended up with cheaper materials if they had kept to their initial budget.
They might not even have their kitchen island, or the bathroom reno. “So overall, from both a budget and design perspective, I think we’ve had a successful renovation,” she gleefully said.

The ID firm that helped the couple bring their plans to fruition was The Association.
Right from the start, Audrey and her husband knew they wanted a firm that could help them make their home seem like a canvas that changes with their needs over time. “We wanted the flexibility of a canvas, avoiding built-ins as much as possible,” she emphasised.
It was very important for them to find an ID that could understand and build their design principles.
Audrey said they went to a number of studios with impressive portfolios, “but they lacked the creative chemistry with us.” It was The Association that was able able to align with the couple, helping them with every twist and turn of the reno journey.
For their furniture sourcing process, which took place during the reno, Audrey said it was tricky for them because of at least two reasons. “One, we couldn’t truly feel the place at all because of all the rubble and dirt.” Fortunately, the process became easier when the flooring got installed, as well as when some of the carpentry was in place.
The second reason was logistics. “Most furniture places were only willing to hold the item for us for a month, but the problem is that we were still unsure when the place will be ready because of the delays,” she said.

To cope with this, they bought one piece of furniture per area at a time, making sure that each purchase aligned with the interior they wanted.
“Our general rule was that materials, colours, and shapes had to complement each other, which helps ensure things work would together well in the end.” This is an especially important approach in an open-concept home since the spaces blend into each other.

“We spent as much time on Carousell as we did in actual retail stores.” Audrey added they were always open to selling pieces that would not work, alleviating us from the burden of getting everything right.
If the couple had to pick the best area of their home, she said that it would be the master bathroom. An unconventional choice, but one that is born out of how much they use the space. “We have absolutely no regrets and can’t imagine it any other way, since we really do spend a lot of time here.”

One of the greatest challenges Audrey and her husband had to go through was finding their property. “After multiple failed attempts at trying to get a BTO, we figured that we didn’t want to wait for a successful BTO ballot to start a five-seven year wait.”
Since their house hunting happened during the lockdown, they had to view most of the units virtually. While some seemed to fit their preferences, Audrey admitted they weren’t confident to make an offer without seeing the unit in person. To make things worse, she said that units were also being snatched up so quickly.
[[nid:587047]]
As they started their reno journey, the couple was surprised to find the general lack of transparency in the industry.
They encountered vague timelines, sparse updates, and little explanation when deadlines were not met. While it was understandable that most issues were due to the pandemic, it was still difficult for them to get the specifics of the delay.
Due to this, Audrey said they learned to be precise and specific with their expectations for meetings and builds.
“When we felt like we couldn’t get a timeline from the ID team, we proposed a timeline and tried to get them to sign off.” The couple ended up getting in touch with various contractors to help coordinate the schedules themselves.
“In short, we did our best to turn any form of frustration into something productive,” Audrey said.
If she had to pick one mistake that they wouldn’t dare repeat again, it would be the selection of the unit.
She admitted that if they had known they would end up overhauling the entire unit, they would have picked a flat with a canvas that they already liked. “Or we could have chosen a more decrepit one truly in need of a makeover,” she jokingly said.

For new homeowners planning to renovate, Audrey offers these two sets of advice: one on furniture sourcing and the other on design.
“On furniture, don’t overlook hand-me-downs and platforms that sell pre-loved items,” she said, “there are a lot of lovely pieces of furniture and decor items that are just so unique, well-priced, and in perfectly good condition.”
She also recommended taking some time to furnish and style your home. And don’t be afraid to change things up as your needs and preferences evolve over time.
When it comes to design, she said it’s more important to have a clear vision of your lifestyle than a clear vision of your design style.
Be honest with how much personal space you need, whether you enjoy cooking or hosting. And if you prefer the latter, don’t put too much stress on the state of your home. “The space for good conversations comes from the heart more than what kind of home you have.”
This article was first published in Stackedhomes.